My First Cybersecurity Journey
The First Week
Oct 31 2025
Hacker’s Handbook
I first started out by looking at what my teacher reccomended me to do. First, she gave me a “Hacker’s Handbook” pdf that included some general info. Some of this general info included:
- Most common types of attacks and why they happen. They mostly happen because of a lack of security and knowledge about security in a website.
- Some simple attacks were mentioned, such as SQL injections, modifying session tokens, and changing prices with hidden HTML inputs for cheaper products.
Microsoft
I then chose a big cybersecurity attack to take a look at. The hack I decided to look at happened in 2021 and targeted Microsoft’s exchange servers. I learned some terms I didn’t know before, such as a “zero-day vulnerability.” I found an example of how microsoft documents their attacks.
Juice Shopping
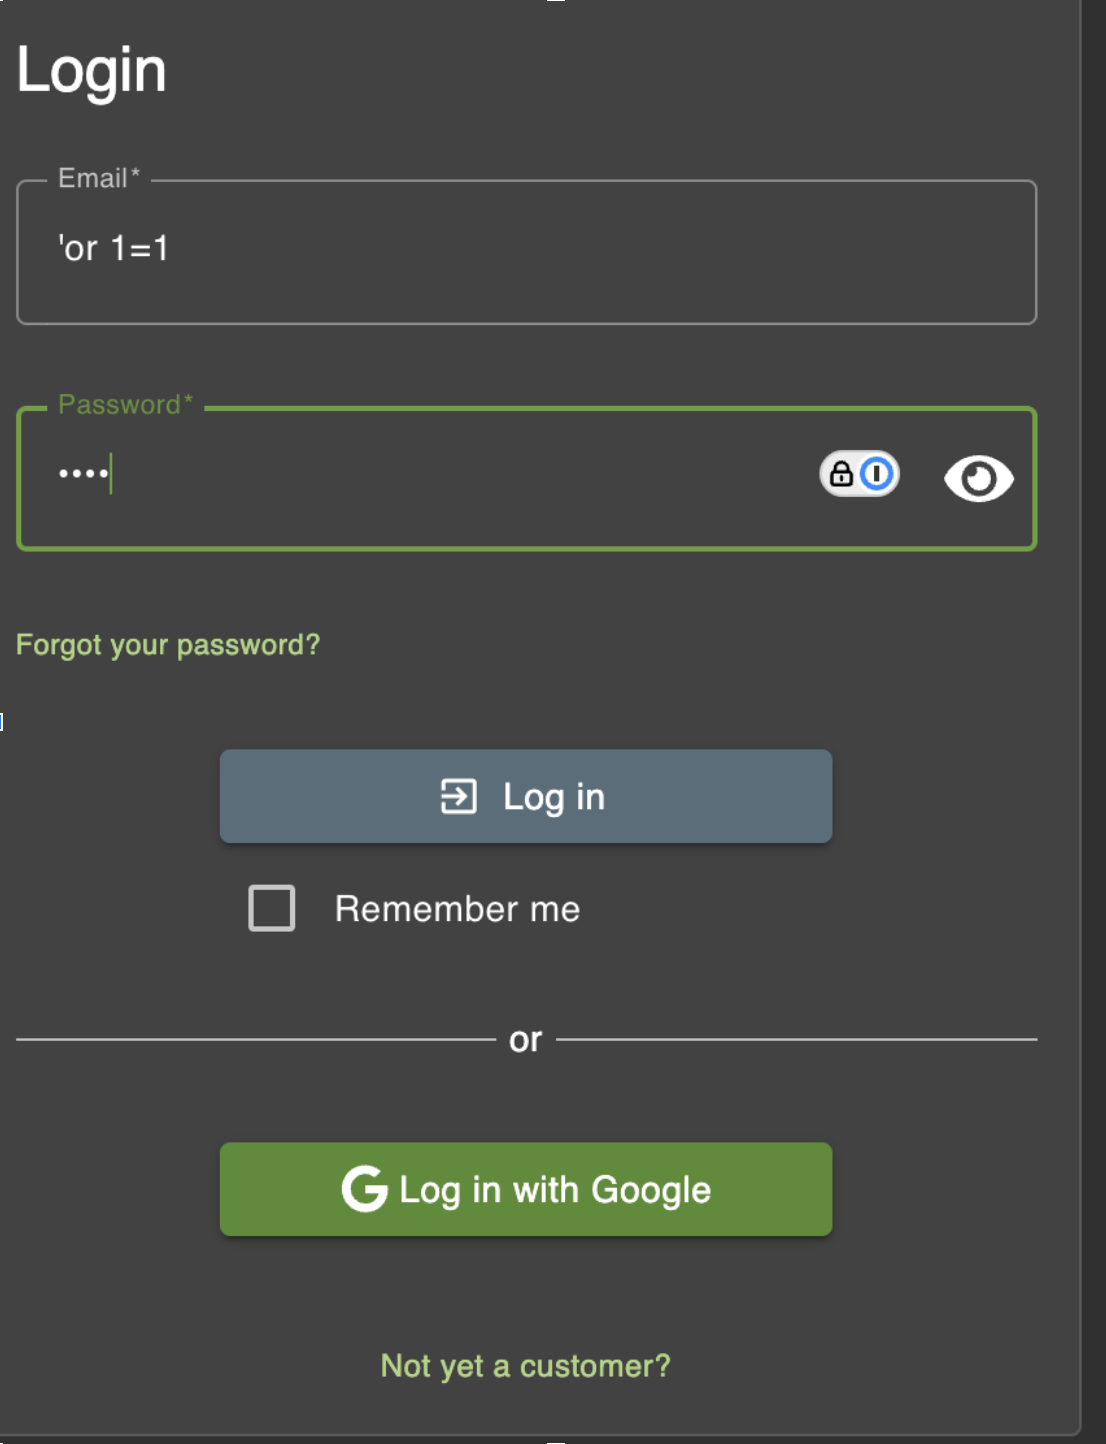
I found a docker image that would create a fake website I can learn how to “hack” on. It’s called OWASP Juice Shop. I first read a little bit about SQL injection, as the first task involved using it. I learned if a SQL query uses concatenation and doesn’t have a sanitizing or validation process, it will be easy to exploit the query’s vulnerabilities. In Juice Shop’s login, you can put into the username input field <’ or 1=1;> to create a SQL query that looks like “sql = “SELECT id FROM users WHERE user = ‘” + “‘ or 1-1;”. This closes the quotes after the first where condition which allows the exploiter to modify the SQL query. By using “or 1=1”, you can make it so it selects the first user made (usually the administrator), because the SQL query will always come out as true.
The Second Week
Hacker’s Handbook
To start off the week, I read part of the Hacker’s Handbook again. Here is a quick summary: One of the main ways of handling user access is authentication. Authentication is a way of verifying the person on the website is who they claim to be. Some common problems with authentication are attackers guessing usernames/passwords, or bypassing the login function. A session is created for each logged in user and has a unique identifier known as a token (a unique string). Tokens help associate HTTP requests with users. A common vulnerability is logging into another user’s account using a compromised token. Tokens can also be guessed if the string is generated in an unsecure way. Access control uses these mechanisms to identify if a user making a request should be authorized to do so.
There are many ways to handle user input. One way is to “reject known bad.” which is blacklisting a set of strings that might be inputted into HTML fields to exploit the website. This is regarded as the least effective method because you can bypass the blacklisted words by making small adjustments to the input. Another method, “accept known good,” whitelists patterns or literal strings that match non-harmful input. If used correctly, this can be the most effective method. The last method, “sanitization,” sanitizes input in many ways. Sanitizing means removing characters from an input that might be involved in an attack.
Blog
I started thinking ahead of how I want to make my portfolio/blog look. I was originally thinking of something visually pleasing but also minimal. I wanted to put minimal things on the website, but also make those minimal things really cool. I thought that would create an effect of looking nice, but also not having too much. A website that has minimal components but also has cool animations, colors, and other aspects of the components is the homepage of Zen Browser.
Google Certificate
Midway through the week, I started looking at the Google Certificate. After careful consideration, I am deciding to take the course. I started a little bit on it, and got some of the modules done.
Lots more Juice Shopping
For the rest of the week, I decided to work a lot on juice shop. I got a lot of the tasks and challenges done. but needed to use a lot of hints.
Some Linux Booting!
I had an old laptop, and a spare USB drive. Why not make use of it? I researched a little bit and found a Linux OS that interested me. I stumbled upon Fedora, which seemed like them most common upon linux users, that and ubuntu. I figured out how to use the Fedora media writer, and started downloading it to the USB drive. When I opened the boot menu of my old laptop and selected the USB drive to boot, it just didn’t boot and instead went back to windows. After doing some research, I found that it was a bug with windows autoplay. If it didn’t work with windows, it must work with linux right? Well it turns out I had another old USB drive with ubuntu already loaded on it. Booted that, worked fine. Downloaded the fedora media writer on ubuntu. Wrote the media. Opened the boot menu. Selected the USB drive, and… perfect! The media check didn’t get stuck at 4.8% this time, and instead continued all the way.
The Third Week
Juice Shop Challenges
My teacher reccomended me a good idea: to document some of my juice shop work. Here are three easier challenges that I worked on.
Challenge 1: Zero Stars
The Objective: Give a devastating zero-star feedback to the store. As soon as I saw this, I had an idea. For lots of the challenges, an idea doesn’t come to me right away. In the website, there is a customer feedback section where you can add a comment and a star rating. I looked at the page, and saw a slider. From my previous web development knowledge, I know that I could probably modify the max and min stars I could input with the sliders. I opened my web tools and took a peek at the slider.
First, I saw in the slider element there was a ‘min’ attribute. I set that to 0 to see what happened when I slid the slider as far back as I could. Nothing. I expanded the element and found an input element within. I set the ‘min’ attribute to 0 on the input element. I slid the slider all the way back, and the indicator said 0. I noticed that the submit button was grayed out. There must be some type of validation. I went back into the web tools and set all the submit button’s ‘disabled’ attributes to false. I was the able to click the submit button and complete the challenge.
Challenge 2: Outdated Allowlist
Let us redirect you to one of our crypto currency addresses which are not promoted any longer. I first decided to try to find a payment screen. I wasn’t sure how to get to my basket, but I figured out that the admin account had some stuff in his basket. I logged in as the admin, and clicked checkout on the basket page. I went through the delivery options, and got to the payment screen. I first tried to see if the admin had any history with paying using crypto, but there was nothing. After ruling out all the sections in the payment section that might have crypto involved but one, I dove deeper.
I opened dev tools and looked at all of the donation and merchandise buttons, but I didn’t notice anything. I tried changing the URL to their donations around, but I eventually decided that would take too long. One trend I saw was that the href to all the ‘a’ tags had redirect?to= in the url. This definetely had to do something with the challenge, because the description mentioned redirects. I thought maybe there would be a leftover redirect somewhere in the code. I went into the main.js and searched if there were any appearences of “crypto” in the code, but nothing useful showed up. I then searched for “redirect?to=”, and scrolled through the results. I found an old function that served no use for the page that redirected you to their crypto address.
Challenge 3: Repetitive Registration
Follow the DRY principle while registering a user. I had no clue what the “DRY principle” was, so I had to look it up. It is a principle of software development aimed at reducing repetition of information which is likely to change. I assumed that I would have to repeat a field when signing up. I assumed i it would have to be with the passwords, because they have to repeat. I first tried to not repeat myself, as the principle says. It just said passwords do not match. I matched the two fields, and then the error was gone. I thought that if the error was gone, maybe the code doesn’t check if they match again after changing it again. I changed the first field, and the matching error still wasn’t there. I was able to register to finish the challenge.
Project Week
Nov 14 2025
Juice Shop and Coursera
I’ve started to drift from juice shop, as I’ve gotten a good introduction from it. I have still been working on the coursera google cybersecurity course. I’ve finished the first two subcategories of the course, and am working on the third. So far, I’ve learned a lot of vocab terms. Some of the most recent ones that I remember are SIEM tools, SOAR tools, and playbooks. During the first subcategory, I learned a lot about cybersecurity jobs.
Project
Feb 2 2025 I’ve decided to start on a project. I’m calling it PacketVision. This project will utilize MatPlotLib and PyShark to visualize packets sent throughout a network. I’ve always wanted to work with MatPlotLib, so this project excites me.
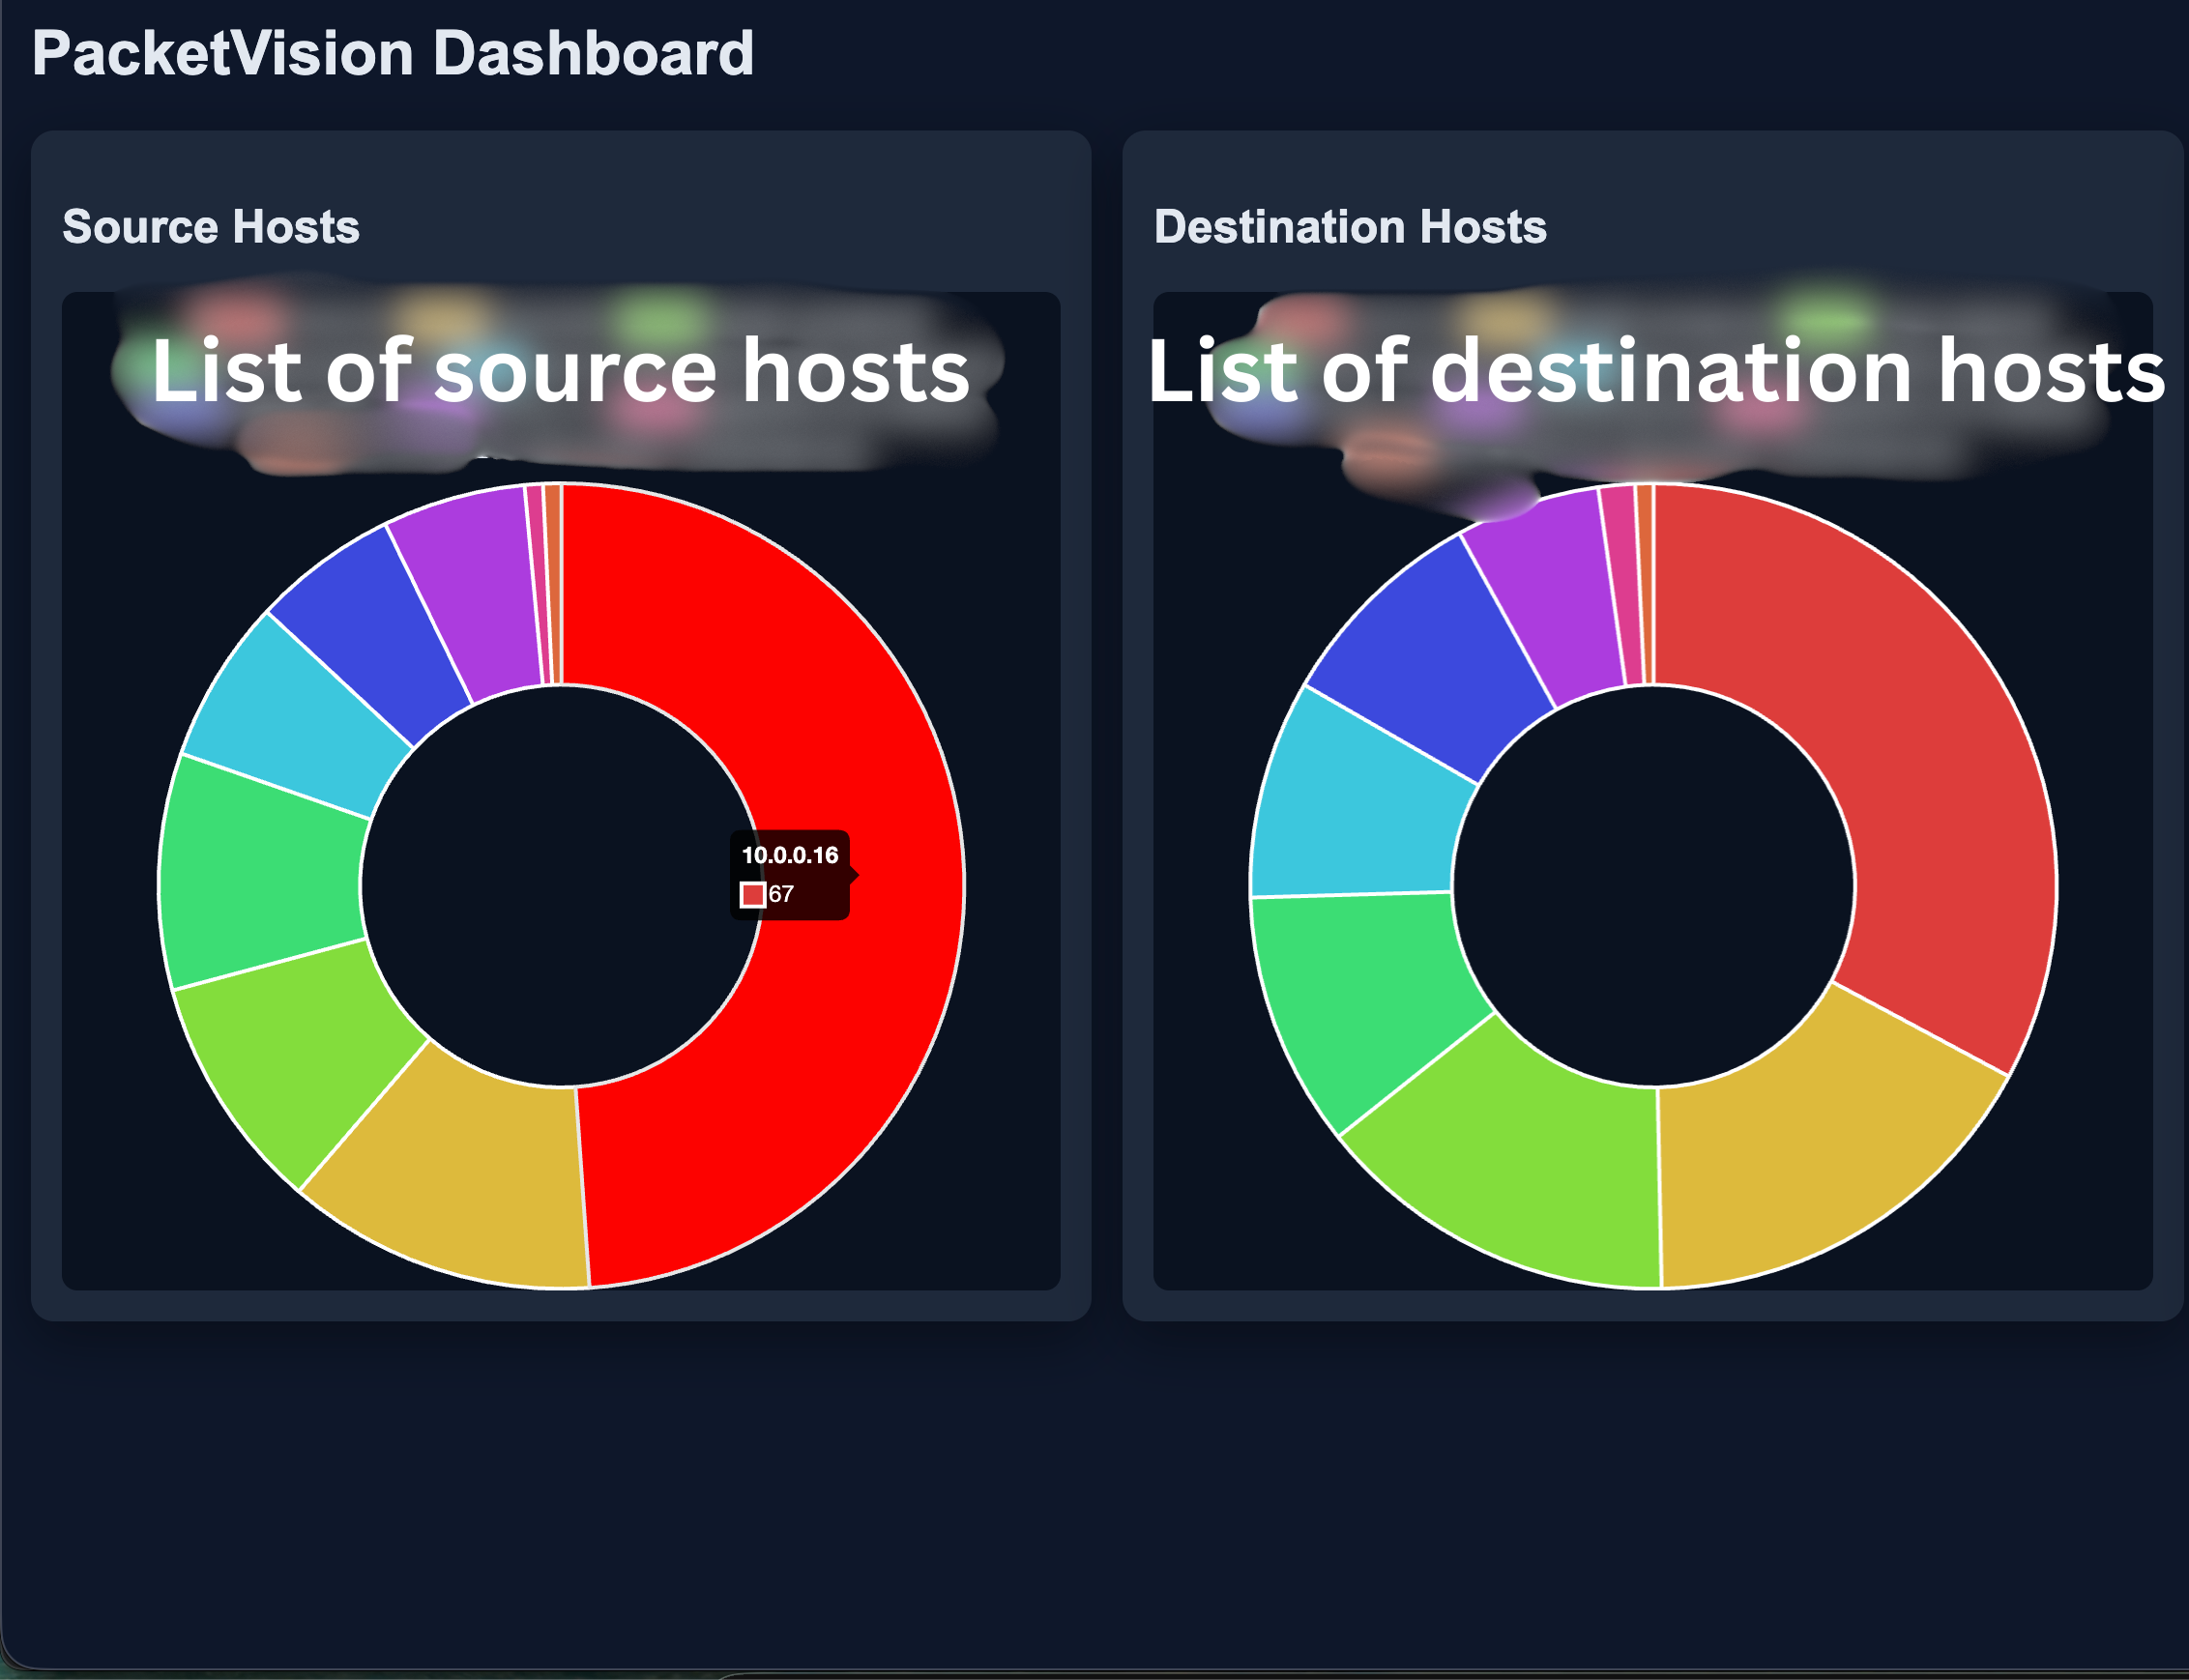
First, I had to figure out how PyShark worked. I’m going to need to learn how to analyze packets as the project progresses. I simply made a list, and then hooked up PyShark to live capture all packets. Then, I used a for loop to analyze each of the packets. I was able to get an IP source and an IP destination. Now I needed to find out the hostnames of both IPs. I found a module for python called “socket.” This would help me reverse DNS lookup each of the IPs. I then had to work on the MatPlotLib. All I did was setup the dimensions for the bargraph, and set up the layout. I appended each of the source ips and destination ips from the packet to their own unique list. I then added that data to the matplotlib graph. When I ran the for loop, the graphs said that the data lists were not equal in length. I realized this is because some of the reverse DNS lookups couldn’t resolve a hostname. Therefore, I put in a try and except, which would help filter out the packets that didn’t have a hostname. After some styling, the result came out like this:
Afterwards, I knew I had to make this more useful. So, I decided to add alerts for suspicious activity. The first alert I decided to add was to detect a port scan. The way I did this is to keep a record of each destination IP a source IP has contacted. Once one source IP has hit more than 20 destination IP’s, it flags it as a port scan.
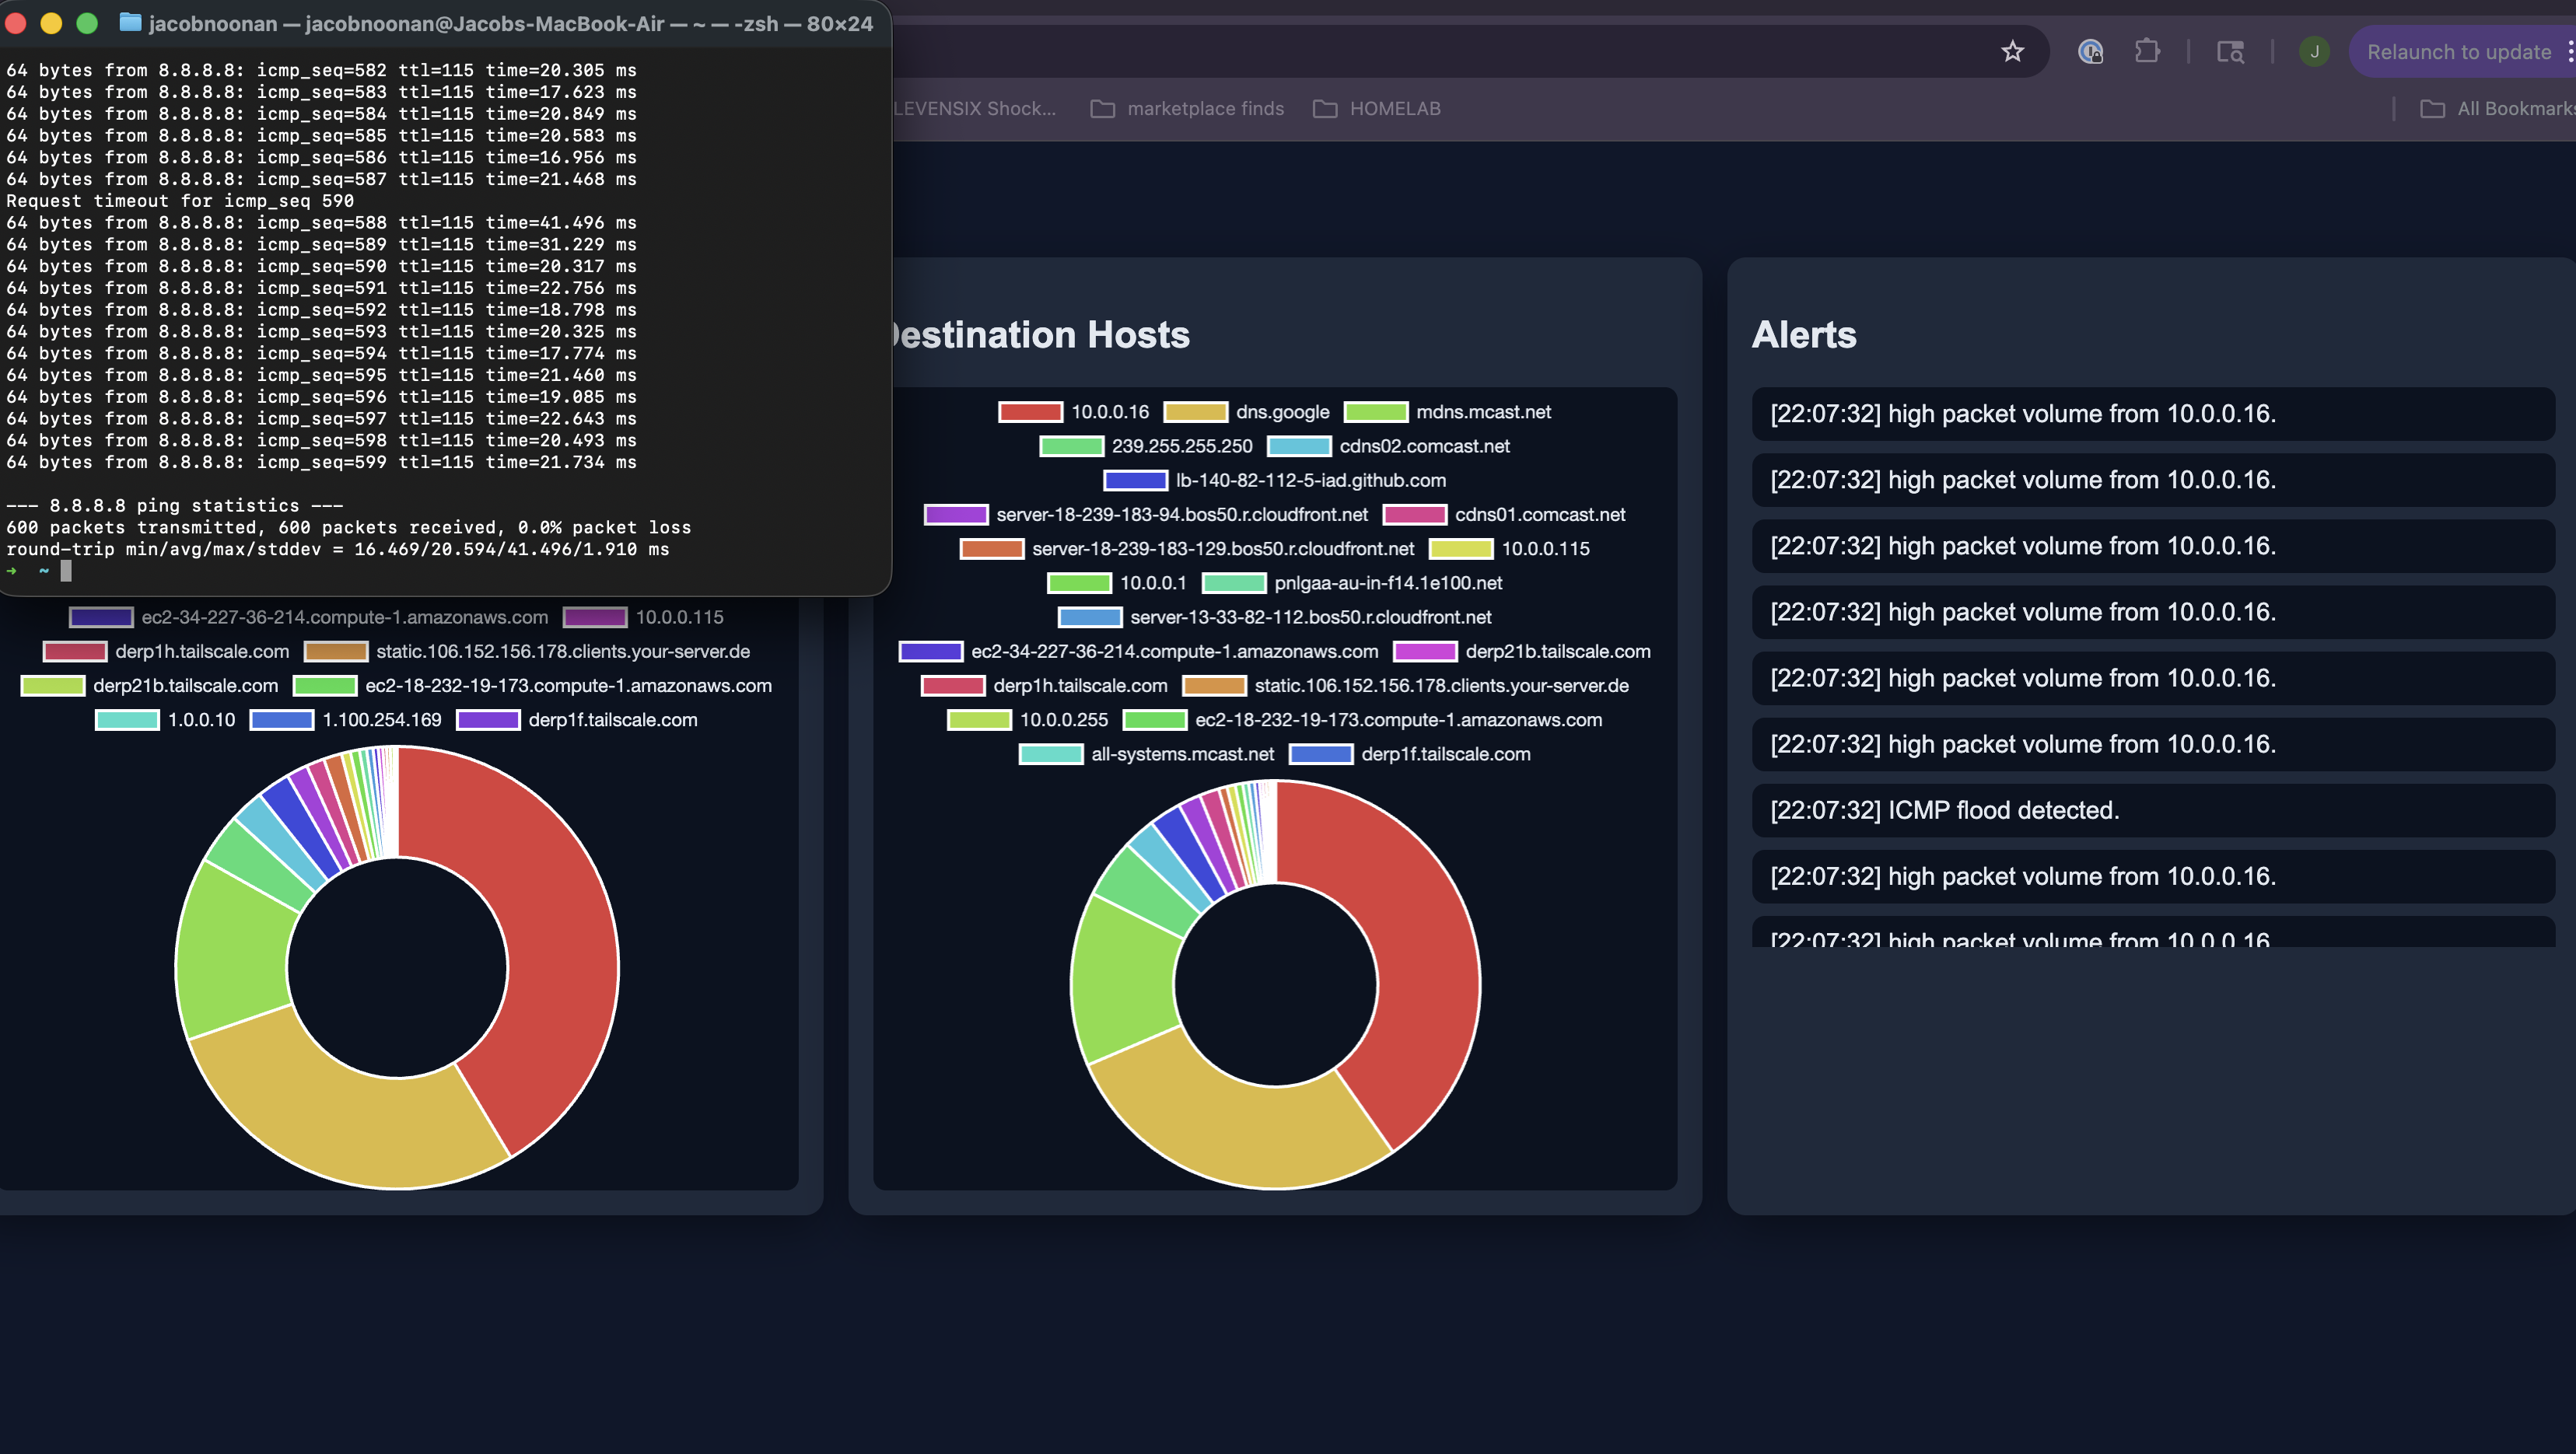
Next, I added an ICMP flood detector and a generic packet flood detector. I simply added an if statement to check if there are more than 100 ICMP packets/any packets in the last 5 seconds.
To detect a source IP reaching a suspicious port, I first created a list of suspicious ports (4444, 1337, 5555). Then, I checked if the list of destination IP’s has one of those ports.
For DNS tunnelling, I checked if the DNS query length was greater than 60. Then it would flag DNS tunneling.
I was able to get the alerts working with some testing commands:
1
2
3
4
5
6
7
8
9
sudo ping -i 0.01 -c 600 8.8.8.8 (icmp flood)

sudo PV_INTERFACE=lo0 python3 packetvision.py (to run in loopback)
nmap -p 1-1000 127.0.0.1 (port scan)

sudo PV_INTERFACE=lo0 python3 packetvision.py (to run in loopback)
nc 127.0.0.1 4444 (suspicious port)

dig aaaaaaaaaaaaaaaaaaaaaaaaaaaaaaaaaaaaaaaaaaaaaaaaaaaaaaaaaaaa.example.com (DNS tunneling)
Once I put these into the terminal, it would test all of the flags. Eventually, with some tweaking around with thresholds and the commands, I was able to get it to work! Here is a sample alert:
Homelabbing
Intro
One way to learn IT infrastructure is to create your own. That is why I am creating a personal homelab. A homelab consists of servers, routers, NAS storage, and so much more. It is good to learn server management and security networking without risk. To begin, I grabbed my old Thinkpad T14s and charged it up.
Prerequisites
I first installed Proxmox, one of the best hypevisors out there. This will be the first part of the structure, and will manage all the virtual machines and container in a web GUI. I had a bit of trouble accessing the web GUI. The problem was that I didn’t have an ethernet cable plugged in, duh. I realized I was out of spaces on my router, so I bought a network switch and also a ethernet to USB, as my Thinkpad did not have an ethernet slot.
Adding more
After succesfully installing Proxmox, I wanted to access it anywhere. I decided to get tailscale, which was pretty simple to install but of course had a little troubleshooting. I then added an Ubuntu VM, and made sure I could SSH into it from my Mac. I learned about snapshots online. Snapshots are basically a backup that you should take everytime you install something new, incase something happens and you need a fresh starting point. I then made some security measures by making sure only I could access it using tailscale, and it won’t be open to the network I am on.
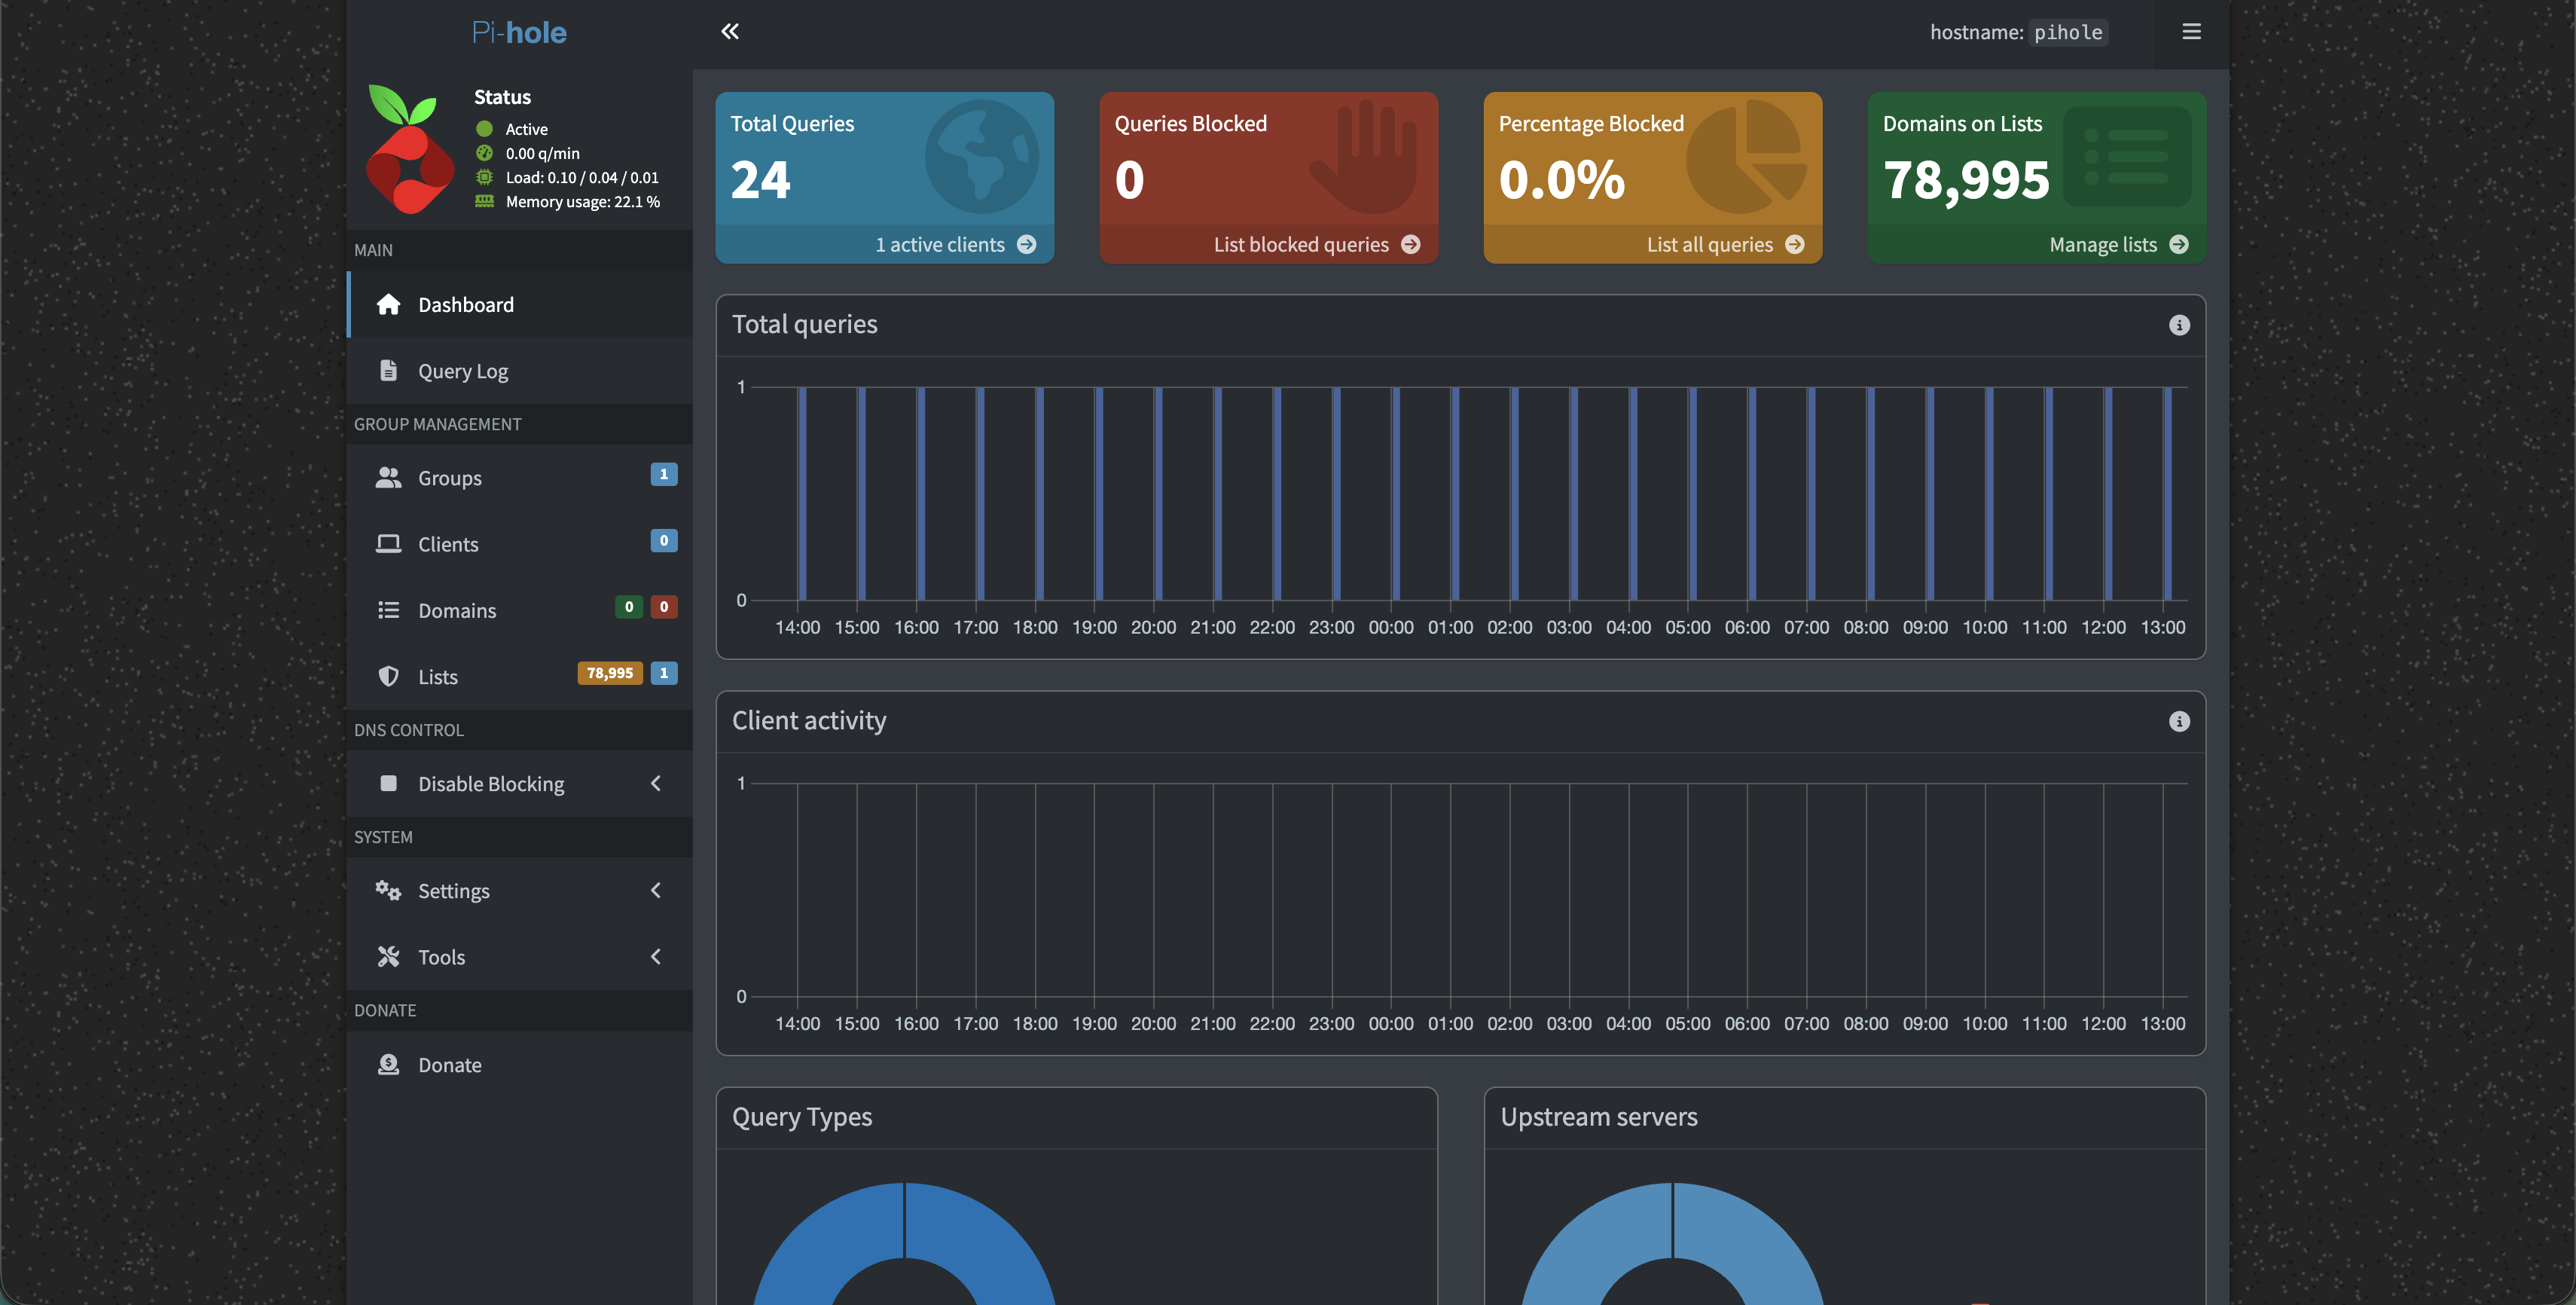
The next step was to install Docker and its containers. The plan for this homelab was to have an adblocker, a monitoring system, and NAS storage. Docker would help me do most of this. The first service I installed using docker was pi-hole (the adblocker). Some troubleshooting was needed. A default ubuntu app was already using port 53, the pi-hole port. I had to kill it and then make sure to change to config to not start it when I turned the homelab on. After some more DNS and DHCP troubleshooting, I was able to access the pihole dashboard:
Feb 8 2025
The next thing I wanted to setup was a NAS storage for my media files. I grabbed a USB encasing for an SSD, and put an SSD inside. I installed Samba for an NAS service and configured it. To connect the USB SSD I had to first identify what it was identified as within the Ubuntu system. After doing that using lsblk, I passed the USB disk to the Ubuntu VM. After, I formatted and mounted it. Finder was misbehaving a little bit, so I had to edit the Samba config and restart finder. I verified that I could access it from tailscale and then I was done. However, the USB SSD encasing was heating up a little bit, so I got a new one, and now need to mount the new one later.
Almost done!
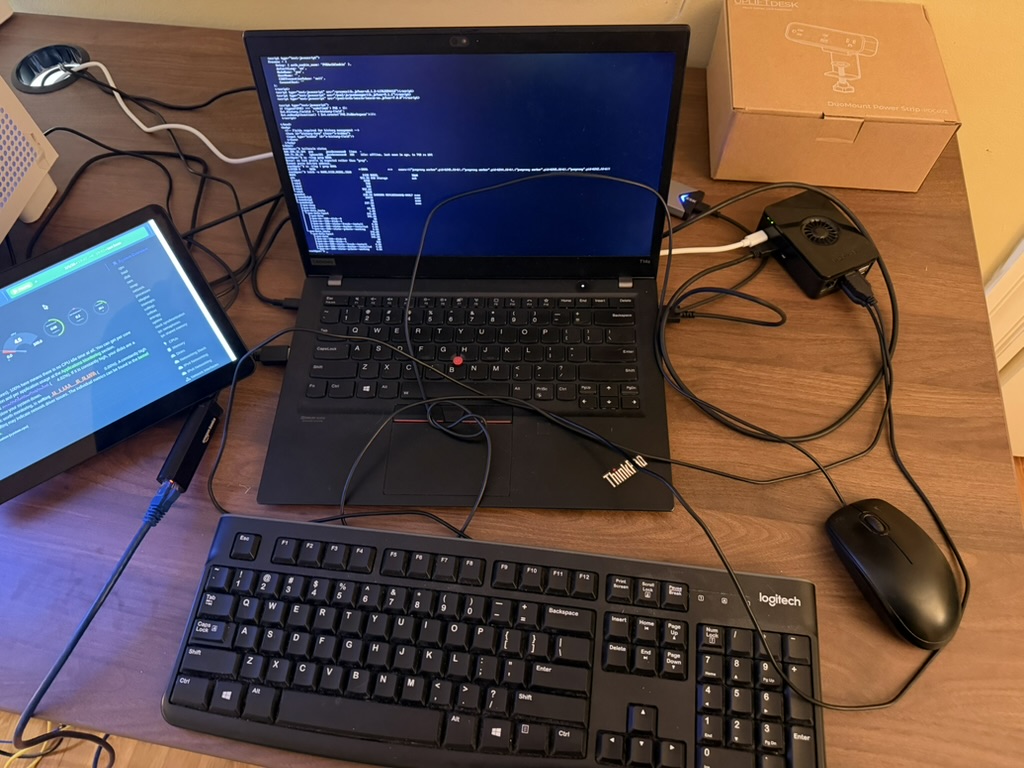
My second to last last addition was to make a dashboard to monitor the homelab, and also add that dashboard to a Raspberry Pi. All I had to do was install netdata on the Ubuntu VM, and then set up the Raspberry Pi after a while of sitting around. Here is how the (very messy) final product looks.
Extra Addition
Mar 9 2025 As a mountain biker who takes a lot of GoPro videos, I need a place for storage. I currently have a server downstairs, however it is easy to access, as you need to be on the same network and need to connect to a server on a file system such as finder. I decided to use the USB encased SSD I plugged in earlier to store some mountain bike videos. I created a program that uses FastAPI to show all the videos and photos in a directory relative to the program. It is plain html and does not need styling. It just needs to be practical and easier to view videos/photos. It is made using Python and Jinja2, and runs directly on the homelab using Docker. I am able to access it using tailscale, and even made a quick-access app on my phone that connects to the NAS storage.
New Big Project
Mar 29 2026 I needed to think of a new project. Looking around my house led me to the camera above my garage doors facing the street. I felt like doing some hardware work, so I made a plan: have the camera detect my car and open the garage door. First things first, it is an old garage door opener so I made sure I could open it remotely first. There was no app, so I resorted to a raspberry pi and a relay module. I found some female-to-female wires, and connected the pi to the relay module. I also added a script into the pi to activate the garage door.
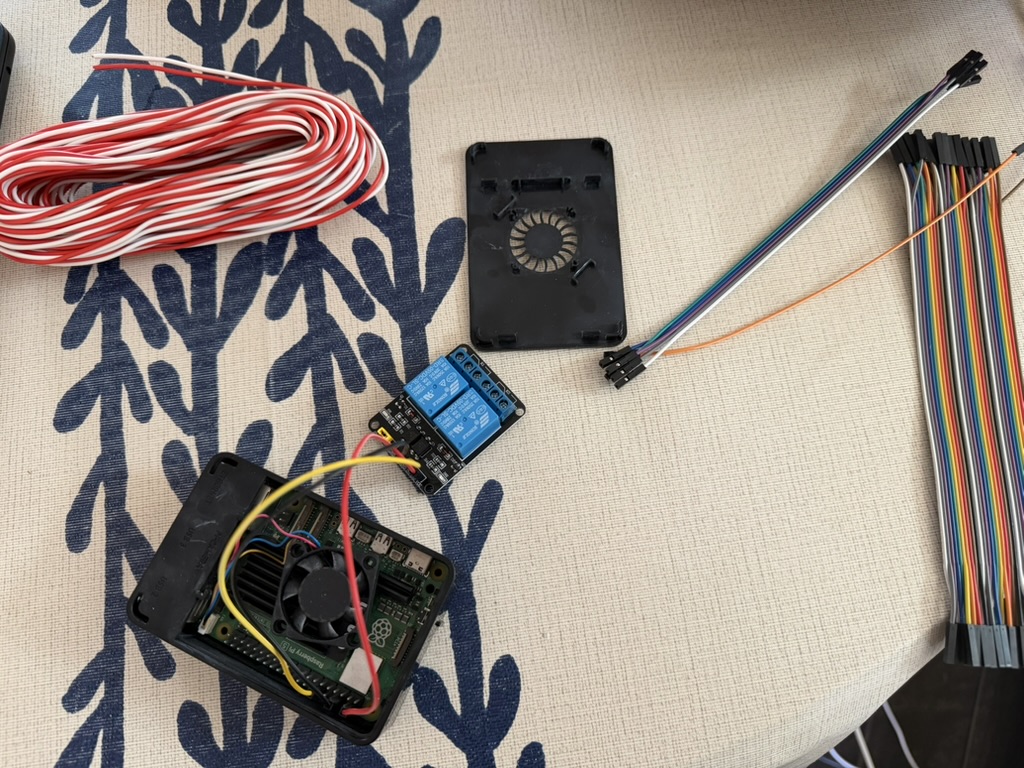
Afterwards, I cut two 1 foot doorbell wires then stripped all ends and connected them to the blue screw terminals on the relay module. I used this diagram to help me:
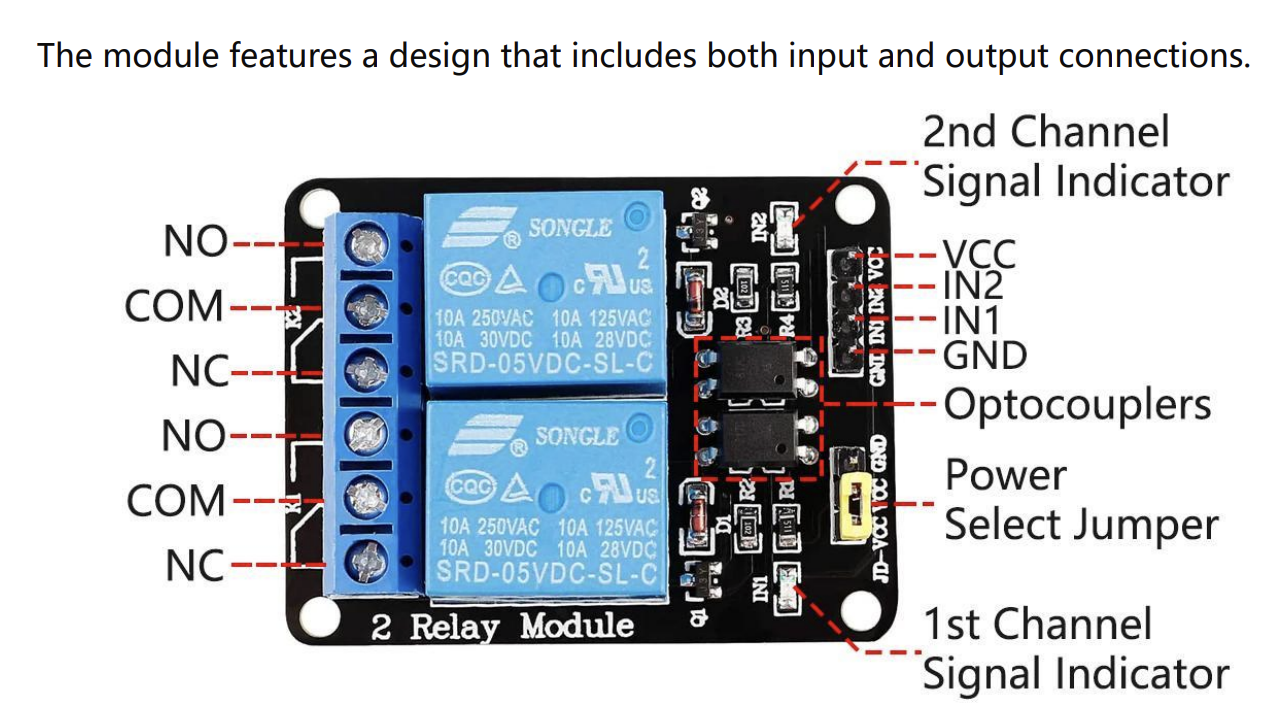
The pi would replicate the shorting of the two screw terminals I found in the wall console/button. After wrapping the doorbell wire around the screw terminals (COM to red screw and NO to white screw), I turned on the pi and ran this script:
1
2
3
4
5
6
7
8
9
10
11
12
13
14
15
16
17
18
19
20
import lgpio
import time

RELAY_PIN = 17
h = lgpio.gpiochip_open(0)
lgpio.gpio_claim_output(h, RELAY_PIN)
lgpio.gpio_write(h, RELAY_PIN, 1)

try:
    input("Press Enter to trigger garage door...")
    print("Triggering...")
    lgpio.gpio_write(h, RELAY_PIN, 0)
    time.sleep(0.5)
    lgpio.gpio_write(h, RELAY_PIN, 1)
    print("Done!")
except KeyboardInterrupt:
    pass
finally:
    lgpio.gpio_write(h, RELAY_PIN, 1)
    lgpio.gpiochip_close(h)
This is how the wiring looks:
After making sure that the Pi could trigger the garage door, I needed to write a program to detect my truck. First I needed the RTSP url for my camera. One challenge I ran into was that my homelab which I planned to run the program on was on a different wifi. So I decided to just run the program on the Pi and switch the wi-fi on the Pi to the one the camera is on.
It took me a while to find the RTSP camera url in the Unifi UI, but eventually I was able to. I used Mosquitto as the message broker, and I just ran the program on Docker. I am also using Frigate as the AI detection for the camera. In the Frigate config, I set the resolution to 1280x720 and 5fps so my Pi doesn’t stress too much.
Next, I had to make the script. I would trigger the relay the same way in the previous script. I made a cooldown so the door wouldn’t trigger over and over again. I also made it print all the MQTT messages for debugging. Then I just added some MQTT setup, and it was done. I tried going in and out of the driveway, but it didn’t open.
Before trying to solve why it wasn’t opening, I also added a zone in the Frigate UI for just my driveway, so it would only trigger if someone pulls into my driveway. I also had to add it in the Frigate config.
After some troubleshooting, I found the main issue. There are two types of events: new and update. New means that there is a new car in the scene, and update means there is a car in the scene that was there before. I was only using the new event to determine if the garage door should open, however the new event never included any zones in the MQTT message. So I would have to use the update messages, and just make sure it wasn’t there before.
After updating the script, it finally worked. It takes a little bit to open, but otherwise it works.